So I decided to pursue the ATX->Fuel conversion as well, with priceless of Pontus' and Recondas' research and diagrams, I can report success.
Oh, did I mention I met with Hamei 2 weeks ago for dinner and beers, he gave me his spare Fuel M/B - proved extremely useful for testing my ATX conversion

I got this:
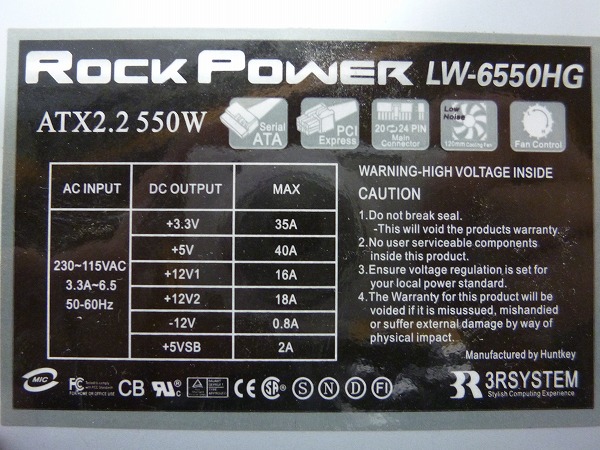
RockPower 550W PSU, ATX2.2, model LW-6550HG (used for ~11$), and another AQTIS 600W AP-600GR (about the same price)
I decided to use the RP - since its power levels are much closer to my Fuel's NMB (lacks a little on the 3V3 and 5Vsb).
(NMB supplies: 27A on 5V, 16A on 12VIO, 18A on 12Vdig, 45A on 3.3V, 3A on 5Vsb, and 0.6A on -12V)
The PSU has 20+4 separable connector, 4-PIN 12V (P4 connector?), couple of HDD Molex, FDD, SATA, and 2x PCI-express.
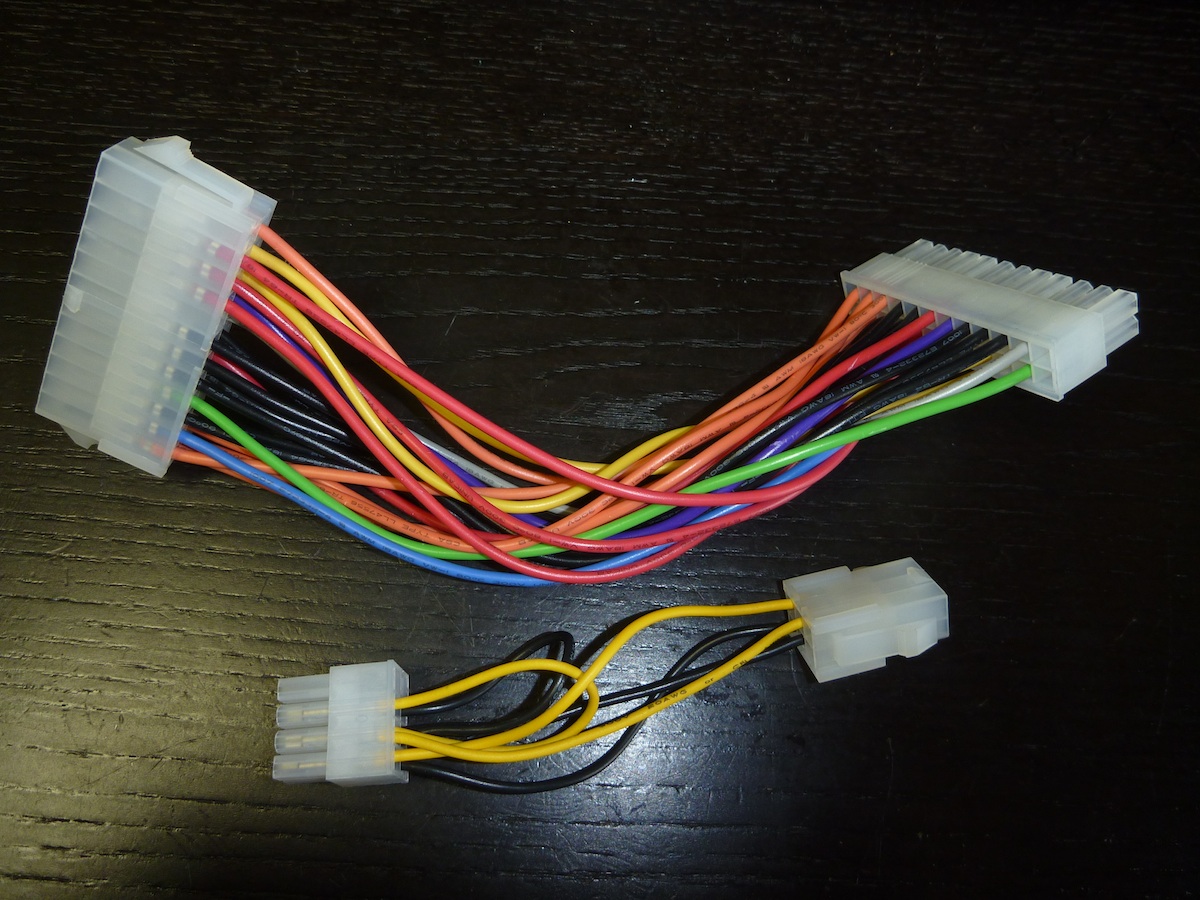
I also bought a few ATX 24-24 extenders, one ATX 24->20 and 20-24, and a few ATX 24 plugs/sockets with pins.
(hint - removing pins without real pin extractor (20$) takes a little practice, I found a sewing needle held tighly in the pliers to work well - wiggle here and there and it works)
Following my own research (looking at pins on the NMB), Recondas' diagram and Pontus' post as well - I've built conversion-extender for ATX.
Started with connecting all the GND pins, and 5VSB, checked L1 - it worked from the start.
As expected, only 5VSB and 3V3SB are available - since I connected only 5V, it means the MB is converting 5V to 3.3 (probably to power up all the env monitoring chips etc).
Code:
Select all
   Connected.


   ALERT: Unknown PSC: 15


   INFO: Cannot disable power supply: 17


   SGI SN1 L1 Controller


   Firmware Image B: Rev. 1.10.12, Built 02/01/2002 14:40:22


   001a01-L1>


   001a01-L1>env


   Environmental monitoring is enabled and running.


   Description    State       Warning Limits     Fault Limits       Current


   -------------- ----------  -----------------  -----------------  -------


   12V   Wait Pwr  10%  10.80/ 13.20  20%   9.60/ 14.40    0.13


   12V IO   Wait Pwr  10%  10.80/ 13.20  20%   9.60/ 14.40    0.13


   5V   Wait Pwr  10%   4.50/  5.50  20%   4.00/  6.00    0.00


   3.3V   Wait Pwr  10%   2.97/  3.63  20%   2.64/  3.96    0.29


   2.5V   Wait Pwr  10%   2.25/  2.75  20%   2.00/  3.00    0.00


   1.5V   Wait Pwr  10%   1.35/  1.65  20%   1.20/  1.80    0.00


   5V aux   Wait Pwr  10%   4.50/  5.50  20%   4.00/  6.00    5.10


   3.3V aux   Wait Pwr  10%   2.97/  3.63  20%   2.64/  3.96    3.29


   PIMM0 12V bias   Disabled  10%  10.80/ 13.20  20%   9.60/ 14.40    0.00


   Asterix SRAM   Wait Pwr  10%   2.25/  2.75  20%   2.00/  3.00    3.29


   Asterix CPU   Disabled  10%   0.00/  0.00  20%   0.00/  0.00    0.00


   PIMM0 1.5V   Disabled  10%   1.35/  1.65  20%   1.20/  1.80    0.00


   PIMM0 3.3V aux   Disabled  10%   2.97/  3.63  20%   2.64/  3.96    0.00


   PIMM0 5V aux   Disabled  10%   4.50/  5.50  20%   4.00/  6.00    0.00


   XIO 12V bias   Disabled  10%  10.80/ 13.20  20%   9.60/ 14.40    0.00


   XIO 5V   Disabled  10%   4.50/  5.50  20%   4.00/  6.00    0.00


   XIO 2.5V   Disabled  10%   2.25/  2.75  20%   2.00/  3.00    0.00


   XIO 3.3V aux   Disabled  10%   2.97/  3.63  20%   2.64/  3.96    0.00


   Description    State       Warning RPM  Current RPM


   -------------- ----------  -----------  -----------


   FAN 0  EXHAUST   Wait Pwr          920            0


   FAN 1       HD   Wait Pwr         1560            0


   FAN 2      PCI   Wait Pwr         1120            0


   FAN 3    XIO 1   Wait Pwr         1600            0


   FAN 4    XIO 2   Wait Pwr         1600            0


   FAN 5       PS   Wait Pwr         1600            0


   Advisory  Critical  Fault     Current


   Description    State       Temp      Temp      Temp      Temp


   -------------- ----------  --------  --------  --------  ---------


   NODE 0           Wait Pwr  60C/140F  65C/149F  70C/158F  20c/ 68F


   NODE 1           Wait Pwr  60C/140F  65C/149F  70C/158F  19c/ 66F


   NODE 2           Wait Pwr  60C/140F  65C/149F  70C/158F  19c/ 66F


   PIMM             Disabled


   ODYSSEY          Disabled


   BEDROCK          Wait Pwr  Not currently available


   001a01-L1>


   001a01-L1>fan


   fan(s) are on.


   fan 0 EXHAUST  rpm 0 (255).


   fan 1 HD       rpm 0 (255).


   fan 2 PCI      rpm 0 (255).


   fan 3 XIO 1    rpm 0 (255).


   fan 4 XIO 2    rpm 0 (255).


   fan 5 PS       rpm 0 (255).


   001a01-L1>serial


   BSN: MEB034    SSN: 08:00:69:10:83:91    Time: 03/09/2012 20:47:22 CST


   001a01-L1>serial all


   Data                            Location      Value


   ------------------------------  ------------  --------


   Local System Serial Number      EEPROM        08:00:69:10:83:91


   Local Brick Serial Number       EEPROM        MEB034


   Reference Brick Serial Number   NVRAM         NSR354


   EEPROM      Product Name    Serial      Part Number           Rev  T/W


   ----------  --------------  ----------  --------------------  ---  ------


   NODE        IP34            MEB034      030_1707_003          F    00


   MAC         MAC ADDRESS     NA          NA                    NA   NA


   PIMM        no hardware detected


   XIO         no hardware detected


   EEPROM      JEDEC Info                Part Number         Rev


   ----------  ------------------------  ------------------  ---


   DIMM 0      no hardware detected


   DIMM 2      no hardware detected


   DIMM 1      no hardware detected


   DIMM 3      no hardware detected


   001a01-L1>


   001a01-L1>power


   Supply          State Voltage    Margin  Value


   --------------  ----- ---------  ------- -----


   12V    off    0.125V      N/A


   12V IO     NC    0.125V      N/A


   5V     NC    0.000V      N/A


   3.3V     NC    0.292V   normal     0


   2.5V    off    0.000V   normal     0


   1.5V     NC    0.000V   normal     0


   5V aux     NC    5.096V      N/A


   3.3V aux     NC    3.285V      N/A


   PIMM0 12V bias     <not present>


   Asterix SRAM     NC ERROR (-204)   normal ERROR (-207)


   Asterix CPU     <not present>


   PIMM0 1.5V     <not present>


   PIMM0 3.3V aux     <not present>


   PIMM0 5V aux     <not present>


   XIO 12V bias     <not present>


   XIO 5V     <not present>


   XIO 2.5V     <not present>


   XIO 3.3V aux     <not present>
Then I connected all the remaining pins except FANC and FANM - in my PSU the fan starts by itself (2PIN Molex).
Another test - (pwr up), the MB starts, reports some minor errors, then complains about fans - but the most important - all the voltages are very very good:
Code:
Select all
   001a01-L1>power up


   ERROR: I2C:not present


   001a01-L1>


   001a01-L1>


   001a01-L1>


   001a01-L1>env


   Environmental monitoring is enabled and running.


   Description    State       Warning Limits     Fault Limits       Current


   -------------- ----------  -----------------  -----------------  -------


   12V    Enabled  10%  10.80/ 13.20  20%   9.60/ 14.40   11.94


   12V IO    Enabled  10%  10.80/ 13.20  20%   9.60/ 14.40   11.94


   5V    Enabled  10%   4.50/  5.50  20%   4.00/  6.00    5.12


   3.3V    Enabled  10%   2.97/  3.63  20%   2.64/  3.96    3.39


   2.5V    Enabled  10%   2.25/  2.75  20%   2.00/  3.00    2.47


   1.5V    Enabled  10%   1.35/  1.65  20%   1.20/  1.80    1.48


   5V aux    Enabled  10%   4.50/  5.50  20%   4.00/  6.00    5.10


   3.3V aux    Enabled  10%   2.97/  3.63  20%   2.64/  3.96    3.29


   PIMM0 12V bias   Disabled  10%  10.80/ 13.20  20%   9.60/ 14.40    0.00


   Asterix SRAM    Enabled  10%   2.25/  2.75  20%   2.00/  3.00    3.29


   Asterix CPU   Disabled  10%   0.00/  0.00  20%   0.00/  0.00    0.00


   PIMM0 1.5V   Disabled  10%   1.35/  1.65  20%   1.20/  1.80    0.00


   PIMM0 3.3V aux   Disabled  10%   2.97/  3.63  20%   2.64/  3.96    0.00


   PIMM0 5V aux   Disabled  10%   4.50/  5.50  20%   4.00/  6.00    0.00


   XIO 12V bias   Disabled  10%  10.80/ 13.20  20%   9.60/ 14.40    0.00


   XIO 5V   Disabled  10%   4.50/  5.50  20%   4.00/  6.00    0.00


   XIO 2.5V   Disabled  10%   2.25/  2.75  20%   2.00/  3.00    0.00


   XIO 3.3V aux   Disabled  10%   2.97/  3.63  20%   2.64/  3.96    0.00


   Description    State       Warning RPM  Current RPM


   -------------- ----------  -----------  -----------


   FAN 0  EXHAUST     Active          920            0


   FAN 1       HD     Active         1560            0


   FAN 2      PCI     Active         1120            0


   FAN 3    XIO 1     Active         1600            0


   FAN 4    XIO 2     Active         1600            0


   FAN 5       PS     Active         1600            0


   Advisory  Critical  Fault     Current


   Description    State       Temp      Temp      Temp      Temp


   -------------- ----------  --------  --------  --------  ---------


   NODE 0            Enabled  60C/140F  65C/149F  70C/158F  20c/ 68F


   NODE 1            Enabled  60C/140F  65C/149F  70C/158F  20c/ 68F


   NODE 2            Enabled  60C/140F  65C/149F  70C/158F  20c/ 68F


   PIMM             Disabled


   ODYSSEY          Disabled


   BEDROCK           Enabled  60C/140F  65C/149F  70C/158F  21c/ 69F


   001a01-L1>


   001a01 ATTN: FAN 3 warning limit reached @ 0 RPM.


   001a01 ATTN: FAN 3 fault limit reached @ 0 RPM.


   001a01 ATTN: brick auto power down in 30 seconds


   001a01 ATTN: brick auto power down in 25 seconds


   001a01 ATTN: brick auto power down in 20 seconds


   001a01 ATTN: brick auto power down in 15 seconds


   001a01 ATTN: brick auto power down in 10 seconds


   001a01 ATTN: brick auto power down in 5 seconds


   001a01 ATTN: brick is powering down now!


   001a01-L1>
If course this was still without RAM,PIMM, no fans etc.
It does complain about some I2C not present - I haven't figured that out yet.
Now - real-world test, I plugged the contraption to my Fuel - and voila, full success.
Code:
Select all
   001a01-L1>env


   ************************************************


   ATTENTION: Environmental monitoring is disabled!


   ************************************************


   Description    State       Warning Limits     Fault Limits       Current


   -------------- ----------  -----------------  -----------------  -------


   12V   Disabled  10%  10.80/ 13.20  20%   9.60/ 14.40   11.938


   12V IO   Disabled  10%  10.80/ 13.20  20%   9.60/ 14.40   12.063


   5V   Disabled  10%   4.50/  5.50  20%   4.00/  6.00    4.992


   3.3V   Disabled  10%   2.97/  3.63  20%   2.64/  3.96    3.320


   2.5V   Disabled  10%   2.25/  2.75  20%   2.00/  3.00    2.470


   1.5V   Disabled  10%   1.35/  1.65  20%   1.20/  1.80    1.466


   5V AUX   Disabled  10%   4.50/  5.50  20%   4.00/  6.00    5.018


   3.3V AUX   Disabled  10%   2.97/  3.63  20%   2.64/  3.96    3.268


   PIMM 12V BIAS   Disabled  10%  10.80/ 13.20  20%   9.60/ 14.40   12.063


   SRAM   Disabled  10%   2.25/  2.75  20%   2.00/  3.00    2.522


   VCPU   Disabled  10%   1.44/  1.76  20%   1.28/  1.92    1.622


   PIMM 1.5V   Disabled  10%   1.35/  1.65  20%   1.20/  1.80    1.495


   PIMM 3.3V AUX   Disabled  10%   2.97/  3.63  20%   2.64/  3.96    3.268


   PIMM 5V AUX   Disabled  10%   4.50/  5.50  20%   4.00/  6.00    5.018


   XIO 12V BIAS   Disabled  10%  10.80/ 13.20  20%   9.60/ 14.40   11.875


   XIO 5V   Disabled  10%   4.50/  5.50  20%   4.00/  6.00    4.992


   XIO 2.5V   Disabled  10%   2.25/  2.75  20%   2.00/  3.00    2.470


   XIO 3.3V AUX   Disabled  10%   2.97/  3.63  20%   2.64/  3.96    3.285


   Description     State       Warning RPM  Current RPM


   --------------- ----------  -----------  -----------


   FAN  0  EXHAUST   Disabled          920         1163


   FAN  1       HD   Disabled         1560         2220


   FAN  2      PCI   Disabled         1120         1534


   FAN  3    XIO 1   Disabled         1600         2250


   FAN  4    XIO 2   Disabled         1600         2136


   FAN  5       PS   Disabled         1349            0


   Advisory   Critical   Fault      Current


   Description       State       Temp       Temp       Temp       Temp


   ----------------- ----------  ---------  ---------  ---------  ---------


   0 NODE 0            Enabled    [Autofan Control]    80C/176F   22C/ 71F


   1 NODE 1            Enabled    [Autofan Control]    80C/176F   22C/ 71F


   2 NODE 2            Enabled    [Autofan Control]    80C/176F   20C/ 68F


   3 PIMM              Enabled    [Autofan Control]    80C/176F   23C/ 73F


   4 ODYSSEY           Enabled    [Autofan Control]    80C/176F   19C/ 66F


   5 BEDROCK           Enabled    [Autofan Control]    85C/185F   22C/ 71F


   ************************************************


   ATTENTION: Environmental monitoring is disabled!


   ************************************************


   001a01-L1>
Note that I still have nothing under FANM and FANC - to make it run I had to disable env monitoring.
My ATX PSU's internal supervisor chip is sg6105dz, and this one doesn't seem to provide any FAN signal, nor does the FAN itself.
Now the next step for me, is to make up some square wave generator to fool the Fuel into thinking the signal is from real fan,
according to my research, it should be 50% duty cycle square wave, with 1 or 2 pulse per revolution (that depends on fan, I don't know which type is the original one - anyone ??) - if I want to report 2000 RPM (my original PSU reports 1900-ish) I need 2000 or 4000 Hz wave - that shouldn't be difficult, the only trick, is that signal needs to peak at 12V (nominal FAN supply), not sure how easy will it be to find a chip which does that.
Alternatively I could just buy a fan with tachyometer - but hey, that would be too easy

I might try to take the other ATX PSU apart and see it's fan - maybe that one has it available... (I didn't choose that PSU for Fuel since it supplies much less power on 3.3 and 5 - though it does supply a lot more on 12V). - it's most likely that new ATX12V standard.
And now mandatory picture of my conversion kit:
One thing I found very interesting, is that 5VSB in my NMB PSU is wired on the PCB to the 3V3 signal - but it DOES deliver 5V...
Cheers


 ] PL: [


